1. Distributive kits
2. Runtime Installation
3. Loading a Test Project into the Runtime
4. HMI Client Installation and Configuration
General HMI Client Installation Procedure
Configuring HMI Client Autostart
Creating an HMI Client Desktop Shortcut
Additional HMI Client Launch Options
5. Crypto Library Installation
6. Operations with Keys
Using a Local Key
Using a Network Key
1. Distributive kits
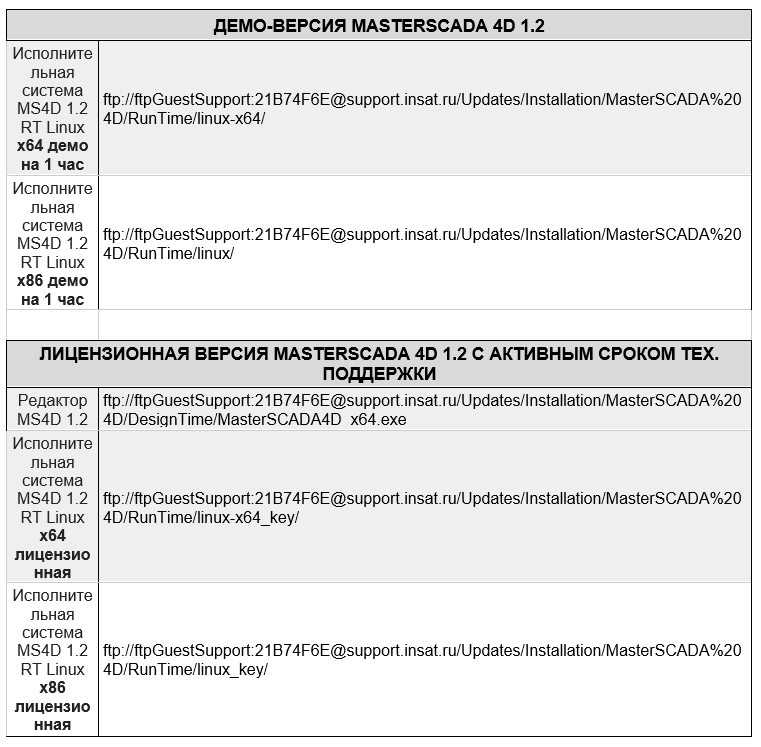
1.1. The distributive kit is selected based on the operating system bitness and the availability of a software product usage license.
1.2. If you need to install a licensed runtime system, you should use the download directories with the postfix '_key'
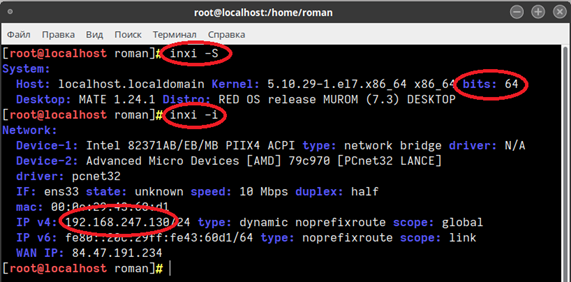
1.3. You can determine the operating system bitness by executing the command:
[user@localhost ~]$ inxi -S

2.1. Install the key dongle (see the Key Operations section, key dongle connection).
2.2. Open a terminal window.
2.3. Switch to administrator mode by executing the command:
[user@localhost ~]$ sudo su
2.4. If the operating system uses SELinux - a mandatory access control system implemented at the kernel level - it must be temporarily uninstalled by executing the command:
[root@localhost]# yum remove selinux*
2.5. Place the installation files in the /tmp folder
2.6. Assign administrator rights to the installer script using the command:
[root@localhost]# chmod u+x ./install.sh
2.7. Start the runtime environment installation process by executing the command
when using a local key:
[root@localhost]# ./install.sh --enable-log --with-reports
when using a network key:
[root@localhost]# ./install.sh --enable-log --with-reports --netkey
2.8. Enable runtime environment autostart upon operating system boot by executing the command:
[root@localhost]# systemctl enable mplc4
2.9. Check the correctness of the runtime environment installation by analyzing the log file data: /opt/mplc4/log/mplc_YYYY_MM_DD.txt, where YYYY_MM_DD is the installation date in the corresponding format (see the Logging section).
2.10. Reboot the operating system by executing the command:
[root@localhost]# reboot
2.11. Check for the presence of the runtime environment process by executing the command:
[root@localhost]# ps -aux | grep mplc
, the execution result should contain information about the launch of processes related to the runtime:
root 3503 0.0 0.0 19664 840 ? Ss 16:14 0:00 nginx: master process /opt/mplc4/nginx/sbin/nginx -p /opt/mplc4 -c /opt/mplc4/nginx/conf/nginx-mplc.conf
root 3510 0.1 0.0 20068 208 ? Ss 16:14 0:00 /opt/mplc4/mplc_service 31550 /opt/mplc4/mplc new /netkey /log:log/mplc_2022_06_30.txt
root 3514 0.7 1.3 697184 107016 pts/1 Sl 16:14 0:01 /opt/mplc4/nodejs/node_ms4d /opt/mplc4/nodejs/index.js --mplc http://127.0.0.1:80 --exemplars 0 --log log/node_2022_06_30.log
root 3527 0.0 0.0 20068 208 ? S 16:14 0:00 /opt/mplc4/mplc_service 31550 /opt/mplc4/mplc new /netkey /log:log/mplc_2022_06_30.txt
root 3532 1.4 0.4 2013640 32984 ? Sl 16:14 0:02 /opt/mplc4/mplc 3 6 /netkey /log:log/mplc_2022_06_30.txt
3. Loading a Test Project into the Runtime.
3.1. Find out the computer's IP address. Enter the command in the terminal:
[root@localhost]# inxi -i
3.2. Specify the IP address in the corresponding property of the Workstation or Server element.
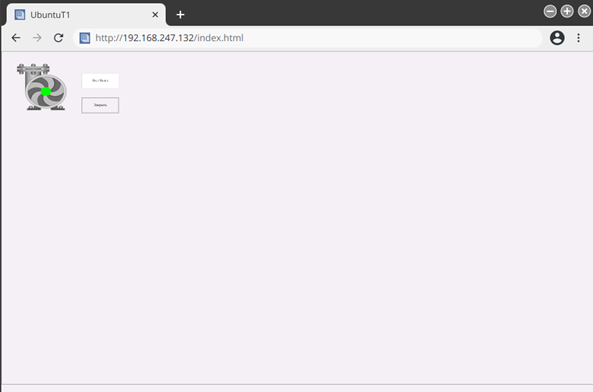
3.3. Load the project into the runtime environment and check the correct operation of the runtime by launching a browser and specifying the URL of the Workstation/Server where the runtime is deployed.
4.1. MasterSCADA 4D Client runs on Linux OS and is installed when it is necessary to connect to a runtime system running on another computer. The device where the client is installed must have Linux OS installed.
Attention! The MasterSCADA 4D Client Linux application is designed for x64-bit operating systems.
4.2. Files for installing the graphical client can be downloaded from the FTP server: ftp://ftpGuestDemo:8AA55D8A@support.insat.ru/MasterSCADA4D/HMI/MasterSCADA4DClient-linux-x64.zip
General HMI Client Installation Procedure
4.3. Place the folder from the archive into the /tmp directory.
4.4. Open a terminal window.
4.5. Switch to administrator mode and sequentially execute the commands:
[user@localhost ~]$ sudo su
[root@localhost]# cd /tmp
[root@localhost]# cp -rp /tmp/MasterSCADA4DClient-linux-x64/ /opt
4.6. Go to the directory /opt/MasterSCADA4DClient-linux-x64
[root@localhost]# cd /opt/MasterSCADA4DClient-linux-x64
4.7. Sequentially execute the commands:
[root@localhost]# chown root:root chrome-sandbox
[root@localhost]# chmod 4755 chrome-sandbox
[root@localhost]# chmod u+x ./MasterSCADA4DClient
[root@localhost]# exit
4.8. Test the HMI client operation by executing the command under a regular user account:
[user@localhost ~]$ cd /opt/MasterSCADA4DClient-linux-x64
[user@localhost ~]$ ./MasterSCADA4DClient -u http://IP
,where IP is the address determined in step 3.1 of the 'Runtime Installation' section of this instruction.
If an empty window loads, you need to additionally specify the port number, for example,
[user@localhost ~]$ ./MasterSCADA4DClient -u http://192.168.247.132:8043
Configuring HMI Client Autostart
4.9. Launch the GUI tool 'Control Center'
4.10. In the 'Personalization' Category, launch the GUI tool 'Startup Applications'
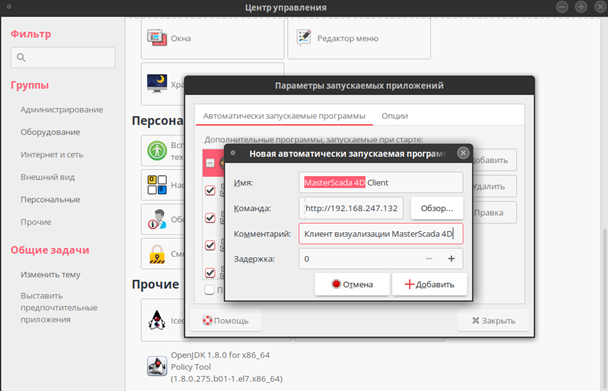
4.11. Add an application by setting the appropriate properties:
Name = MasterScada 4D Client;
Command = /opt/MasterSCADA4DClient-linux-x64/MasterSCADA4DClient -u http:// IP, where IP is the address determined in step 3.1 of the 'Runtime Installation' section of this instruction;
Comment = MasterScada 4D HMI Client.
4.12. After filling in the properties, click the '+Add' button.
4.13. Log out of the user session.
4.14. Start a user session to ensure that the HMI client launches.
Creating an HMI Client Desktop Shortcut
4.15. On the desktop, call the context menu by right-clicking.
4.16. Select the 'Create Launcher' item from the context menu.
Specify the properties:
Type = Application;
Name = MasterScada 4D Client;
Command = /opt/MasterSCADA4DClient-linux-x64/MasterSCADA4DClient -u http:// IP , where IP is the address determined in step 3.1 of the 'Runtime Environment Installation' section of this instruction;
Comment = MasterSCADA 4D HMI Client.
Additional HMI Client Launch Options
4.17. To launch the HMI client in full-screen mode, add the '--noframe' option to the launch command. The launch command will look as follows:
/opt/MasterSCADA4DClient-linux-x64/MasterSCADA4DClient -u http:// IP --noframe , where IP is the address determined in step 12.1 of the Runtime Installation section of this instruction.
To disable the taskbar, add the '-f' option to the launch command. The launch command will look as follows
/opt/MasterSCADA4DClient-linux-x64/MasterSCADA4DClient -u http:// IP --noframe -f
Attention! Before enabling the '-f' option, which disables the taskbar, the project must include a procedure for closing the HMI client. In the project attached to this instruction, such a possibility is implemented by pressing the 'Close' button.
5. Crypto Library Installation
5.1. In some cases, the Linux operating system may lack the crypto library required for the runtime environment to function
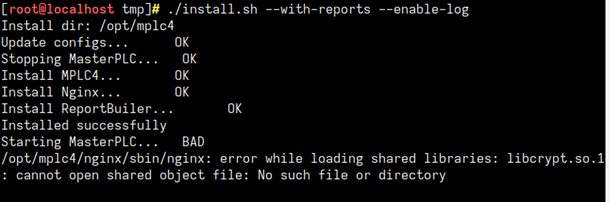
5.2. In this case, it is necessary to install the package containing the library that provides encoding and decoding procedures (encryption/decryption library).
5.3. You can determine the name of the package containing the library by executing the command:
[root@localhost]# yum provides "libxcrypt.so.1"
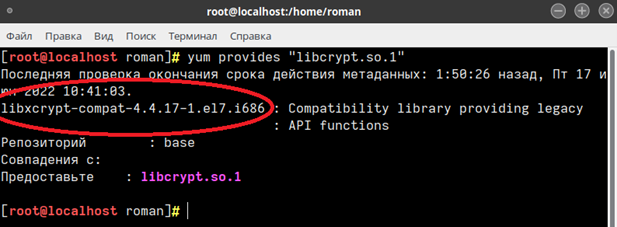
5.4. The package can be installed from the command line with the command
[root@localhost]# yum -y install libxcrypt-compat
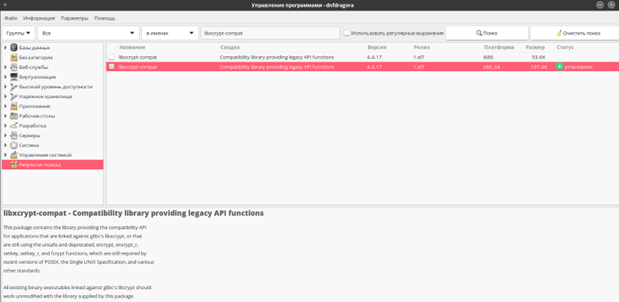
5.5. Or use a special GUI tool
6. Operations with Keys
Using a Local Key
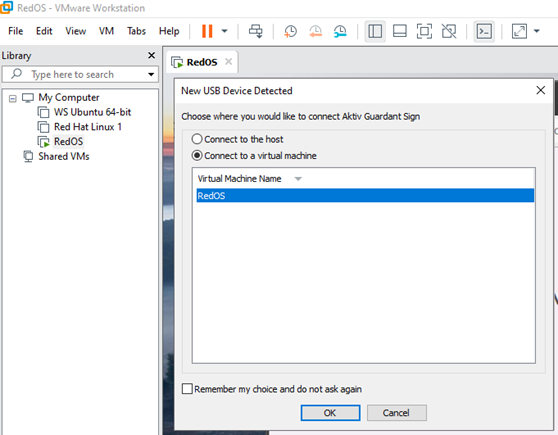
6.1. If the runtime being installed is licensed with a local key and is being installed on a Linux operating system deployed on a virtual machine, then the key mounting procedure looks approximately like this:
6.2. Insert the USB key into the port.
6.3. Connect the USB key to the virtual machine (see figure).
6.4. When starting the runtime on Linux, information about the key will be reflected in the log file /opt/mplc4/log/mplc_YYYY_MM_DD.txt, where YYYY_MM_DD is the date in the corresponding format, for example:
Log to : log/mplc_2022_07_14.txt
MasterSCADA 4D RT started (1.2.16.27212) Date: Jun 29 2022 15:58:27 ID: Guardant Platform: linux-x64 (11)
(PID=25637) (Dir=/opt/mplc4)
ProgramPath=/opt/mplc4/ DataPath=/opt/mplc4/
39981213: Change state from 00 to 03 (1)
Date=14.07.2022 Time=11:06:21:213
No File: NET = FALSE
Key found : 3EED798F
6.5. If the key is not recognized by the runtime, information about this will be reflected in the log file as a line:
Key error 1 : Dongle Not Found
Using a Network Key
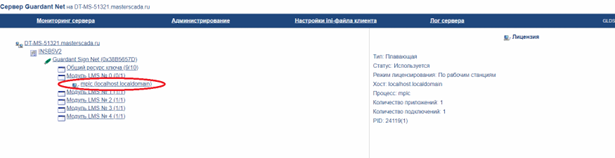
6.6. To use a network key, it is necessary to deploy the Guardant Net Server (see. Guardant Net Server / Download Center / Support / Guardant).
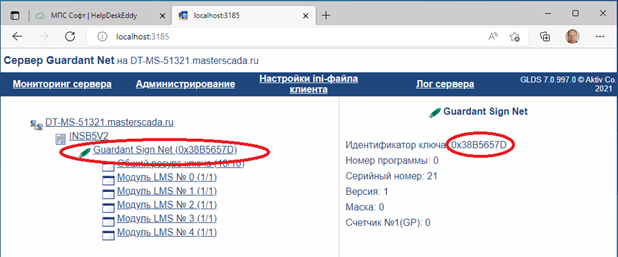
6.7. Connect the USB key, which must be detected by the Guardant Net server.
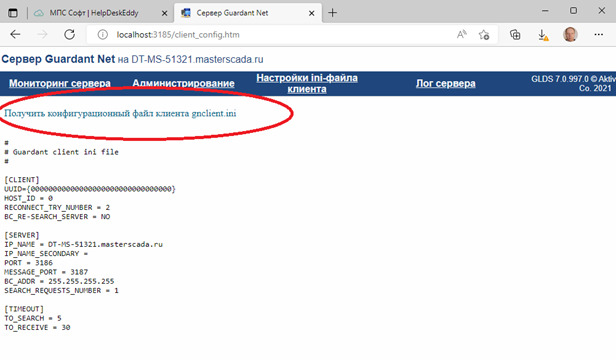
6.8. Generate a configuration file, placing it in /opt/mplc4/
6.9. If necessary, make changes to the file, for example, specifying the IP address of the Guardant Net server
6.10. Start the runtime on Linux
6.12. When starting the runtime on Linux, information about the key will be reflected in the log file /opt/mplc4/log/mplc_YYYY_MM_DD.txt, where YYYY_MM_DD is the date in the corresponding format, for example:
Log to : log/mplc_2022_07_28.txt
MasterSCADA 4D RT started (1.2.16.27525) Date: Jul 18 2022 19:48:01 ID: Guardant Platform: linux-x64 (11)
(PID=24119) (Dir=/opt/mplc4)
ProgramPath=/opt/mplc4/ DataPath=/opt/mplc4/
54926986: Change state from 00 to 03 (1)
Date=28.07.2022 Time=15:15:26:986
No File: NET = TRUE
Key found: 38B5657D